Block Storage
ClawCloud's block storage service is a high-performance storage solution specifically designed for Cloud VPS, aimed at meeting data storage needs across various business scenarios. Based on highly available storage media and combined with efficient network technology, ClawCloud block storage offers outstanding performance and extremely low latency, providing users with an exceptional data access experience.
Advantages of Block Storage
Block Storage Relibility
- Multi-Replica Mechanism : ClawCloud's block storage service ensures high data reliability through multi-replica technology. Each piece of data is stored in multiple replicas across different physical locations, significantly reducing the risk of data loss due to single point failures.
- High Security and Reliability : Thanks to the multi-replica storage strategy, ClawCloud's block storage achieves a data security level of 99.9999999%, which equates to an extremely low probability of data loss annually. This level of reliability allows users to confidently host critical business data.
Data Reliability
- Automatic Migration Capability : Our block storage service features an automatic migration function, which swiftly migrates to a normally operating instance in the event of an instance failure, minimizing the impact of downtime on business continuity.
- Snapshot Backup Support : ClawCloud offers snapshot backup functionality, allowing users to easily perform periodic data backups. Snapshots can be used for quick recovery to specific time-point versions and provide convenient operational support for development, testing, and data recovery in abnormal states.
With these security measures, ClawCloud's block storage service not only offers excellent performance and storage flexibility but also safeguards users' data. Whether dealing with routine operations or unexpected failures, ClawCloud's storage solutions ensure that your business runs smoothly and efficiently.
Types of Block Storage
ClawCloud's block storage service supports random read and write operations, efficiently handling data storage needs for most general business scenarios. Users can format block storage in Cloud VPS just like using a physical hard drive and create a file system as needed, making data management and usage more convenient.
Block storage is primarily divided into two types: system disk and data disk.
System Disk
- Function and Purpose : As the boot disk for Cloud VPS, the system disk is used to store the operating system, program files, and other system-related data.
- Creation and Lifecycle : The system disk is created simultaneously with the Cloud VPS instance, and its lifecycle is synchronized with the attached Cloud VPS instance. When the instance is deleted, the system disk is also deleted. This design ensures that all necessary system resources are prepared during the instance creation phase.
Data Disk
- Function and Purpose : The data disk is used to store user data, logs, and other non-system-related application data.
- Flexibility : The data disk can be mounted or unmounted at any time according to business needs, providing great flexibility. Users can flexibly adjust the data disk capacity, supporting up to 16TiB of storage capacity to meet various business scales and data storage needs.
Efficient Storage Solutions
ClawCloud's block storage solutions, with their flexibility and efficiency, ensure that Cloud VPS can obtain stable and reliable data storage support in various application scenarios. Whether running critical business applications or processing large amounts of data, ClawCloud's storage service provides strong support for users:
- When running critical business applications, the high reliability and fast boot capabilities of the system disk can enhance the overall system response speed;
- In scenarios requiring large-scale data processing and storage, the flexible expansion features of the data disk can accommodate various storage needs and optimize data management processes.
Through this optimized block storage solution, ClawCloud not only enhances storage efficiency and flexibility but also provides users with a reliable way to manage and store their growing data assets.
Data Security and Protection Measures
ClawCloud places a high priority on the privacy and security of user data, ensuring that the privacy and security of user data are crucial. Deleted data will not be accessible by any other user in any way, and in the distributed block storage system, deleted data will be thoroughly erased.
Data Erasure Mechanism
1. Sequential Append Write Technology
Underlying Design
ClawCloud's block storage is designed based on sequential append write technology, fully leveraging the high bandwidth and low latency characteristics of sequential writing on physical disks. This design optimizes write efficiency while providing technical assurance for complete data erasure.
Logical Deletion Handling
When performing data deletion operations, the deletion logic is recorded as metadata. For any read operations targeting the logically deleted space, the storage system will return all-zero data. This approach ensures that deleted data cannot be read or recovered, preventing data leakage.
2. Overwrite Protection
Implementation Method
When performing overwrite operations, the system does not immediately overwrite the corresponding space on the physical disk. Instead, it achieves overwrite operations by adjusting the mapping relationship between logical space and physical space. This adjustment of mapping relationships allows new data to be effectively written while the old data is not immediately physically overwritten.
Data Protection
All old data that is overwritten at the logical level will eventually be forcibly and permanently cleared from the physical disk. This process ensures that old data is completely deleted from the storage medium, further enhancing data security.
3. Resource Recycling and Zeroing
Block Device Release
When a block device (block storage) is released, the storage system immediately destroys its metadata, preventing any further access attempts. This mechanism ensures that data on the released block device cannot be read again.
Space Recycling and Initial State
Before physical storage space is reallocated, it is thoroughly zeroed out, ensuring that the newly created block storage returns all-zero data before its initial read. This zeroing mechanism prevents new users from accessing old data that may have been retained by the previous user.
Data Security Advantages
These optimized data erasure and protection mechanisms collectively build ClawCloud's highly reliable data security system:
- Complete Data Overwrite : By adjusting the mapping between logical and physical space, data is thoroughly overwritten and erased.
- Efficient Data Zeroing : Zeroing before releasing storage space ensures complete data deletion, preventing old data from being read by new users.
- Instant Metadata Destruction : Metadata is destroyed the moment a block device is released, preventing any further access or data recovery.
Applicable Scenarios
ClawCloud's data erasure and protection mechanisms are suitable for various scenarios requiring high data security and privacy protection, including but not limited to:
- Enterprise Storage Solutions : Used for storing sensitive customer information and confidential business data.
- Cloud Computing Environments : Providing secure storage and data protection for dynamic cloud resources.
- Data Recovery : Preventing any form of data leakage and recovery during data deletion and system resource recycling.
Through comprehensive technical and management measures, ClawCloud ensures absolute security of user data during deletion and overwriting processes. Based on advanced sequential append write technology, overwrite protection, and strict zeroing mechanisms, ClawCloud provides highly reliable data storage and protection solutions. Regardless of business requirements, ClawCloud can provide users with robust and secure storage services, ensuring data privacy and integrity.
Data disk activation tutorial
Activate data disk
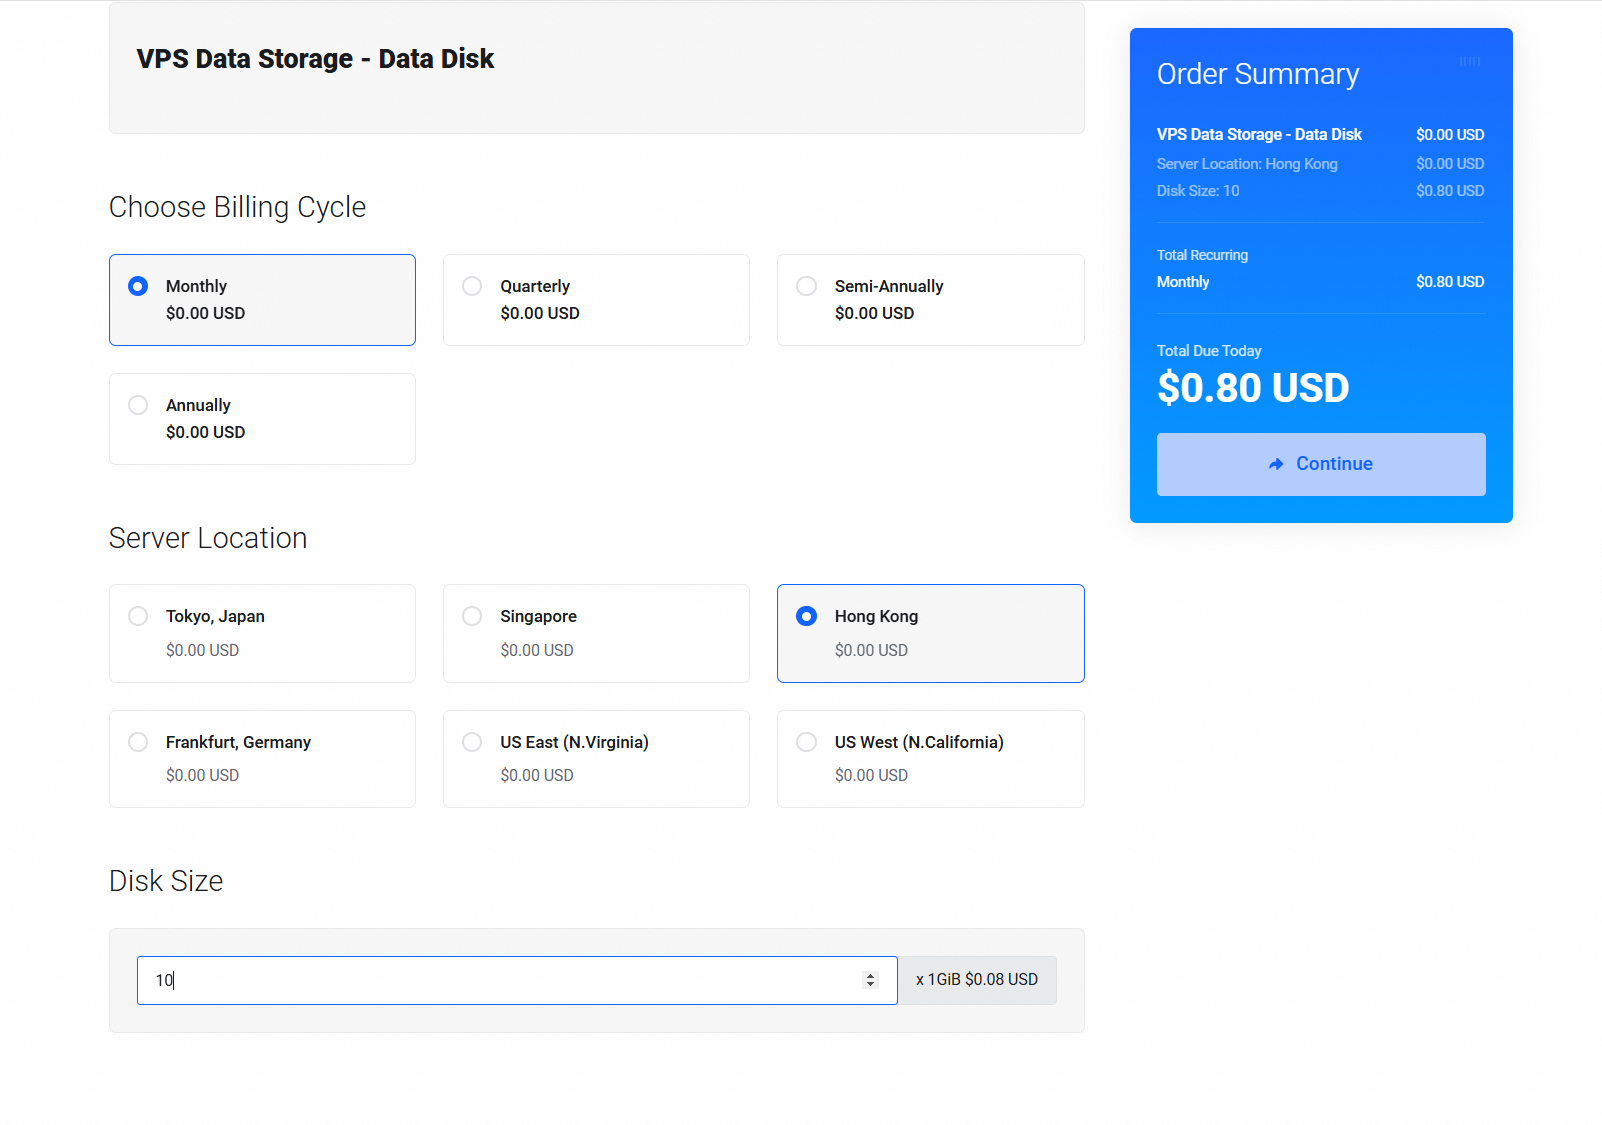
- through the page of purchasing data disks, you can Choose monthly payment, quarterly payment, semi-annual payment and annual payment under [Choose Billing Cycle] to purchase data disks. Under the [Server Location] command, select the same region as the mounted Cloud VPS,For example, the purchased server is in the Singapore region, and the mounted data disk must also be purchased in the Singapore region.
- Under [Disk Size], we can purchase the required data Disk capacity as needed. Currently, the minimum capacity is 10GiB and the maximum capacity is 16TiB.
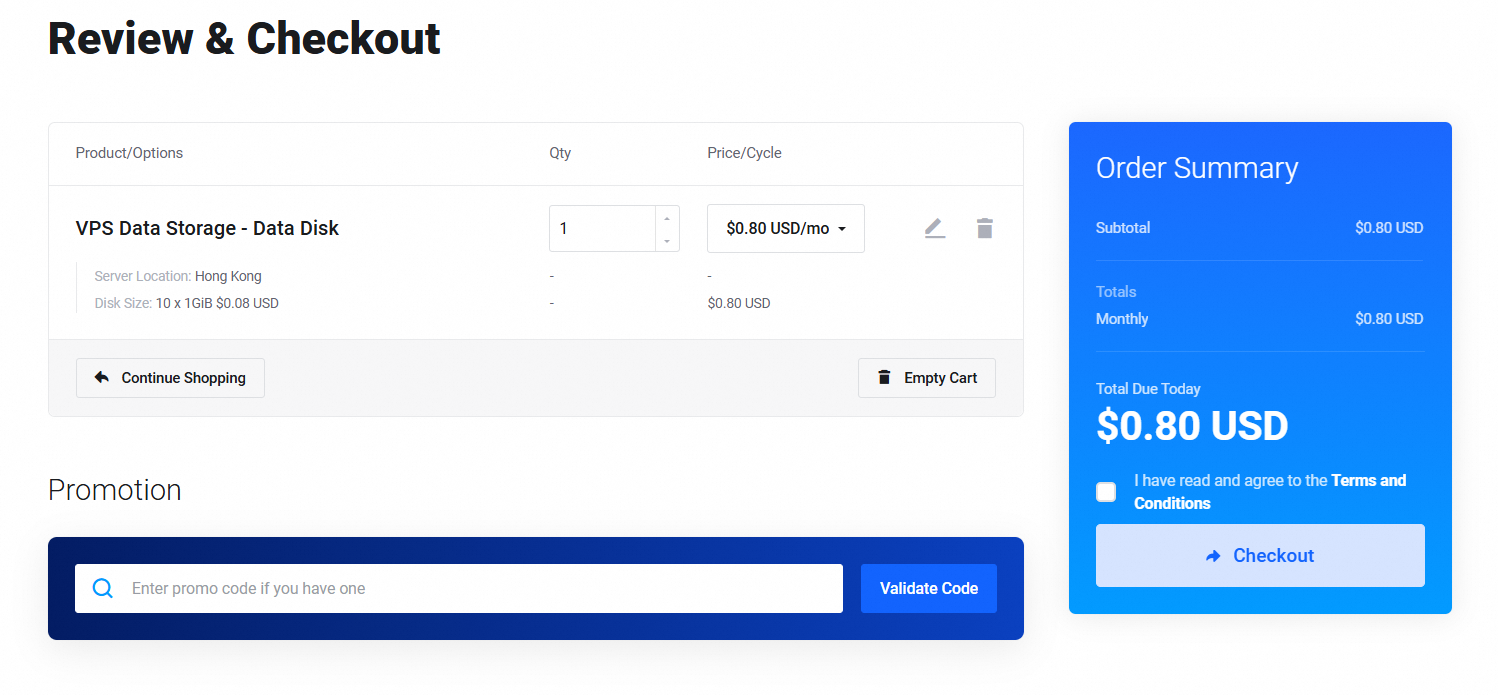
- On the [Review & Checkout] page, after confirming that the information is correct, click the Checkout button and agree to the service agreement before making payment.
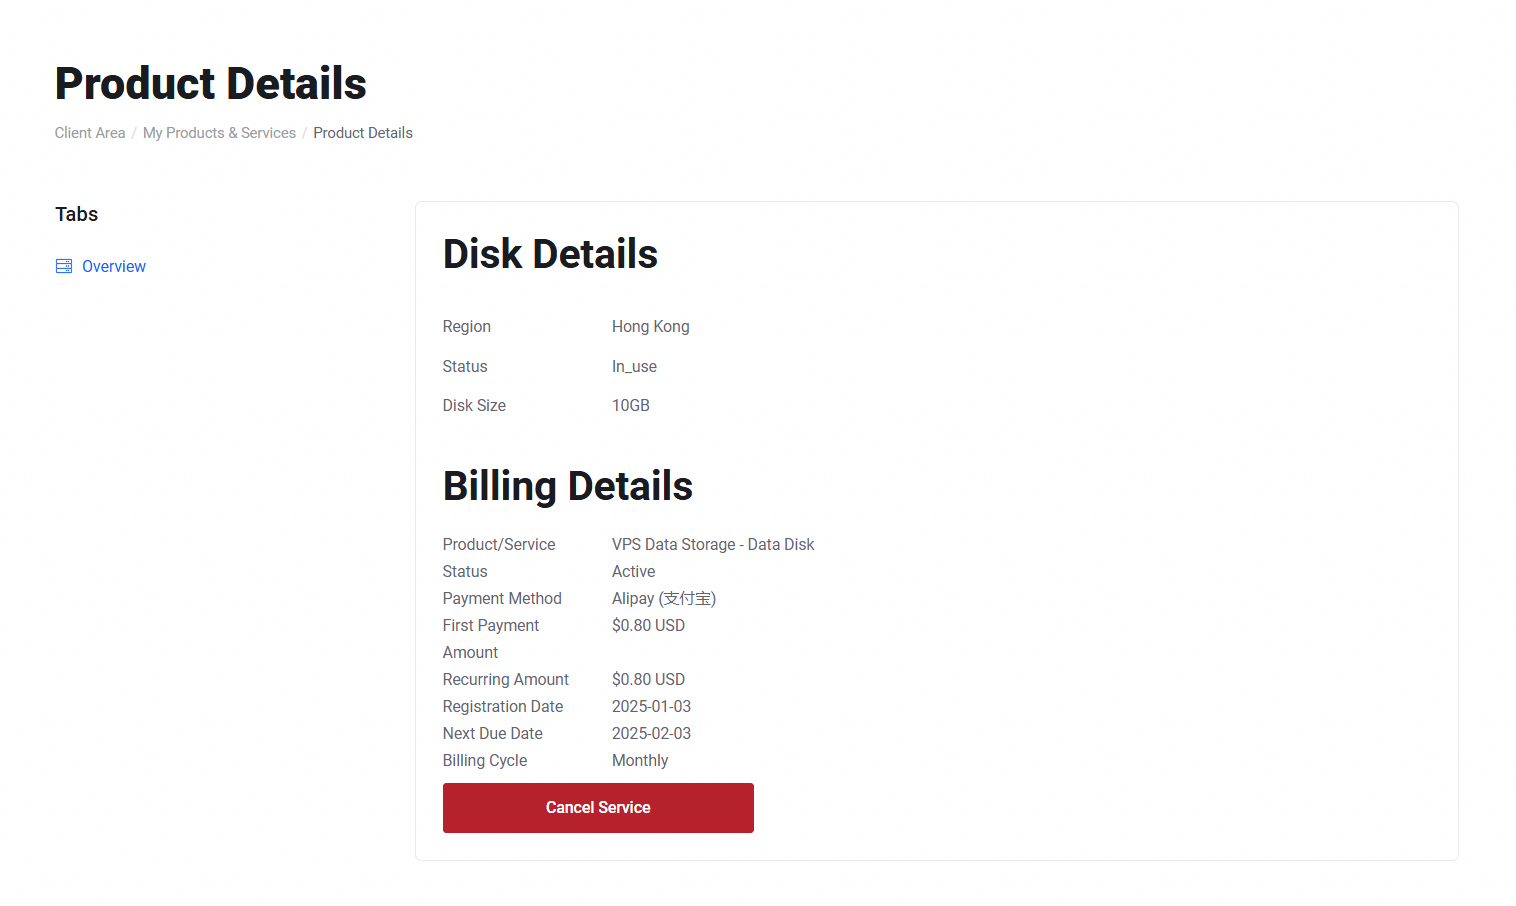
- after the payment is completed, you can view the data disk in the product details.
Attach to Cloud VPS
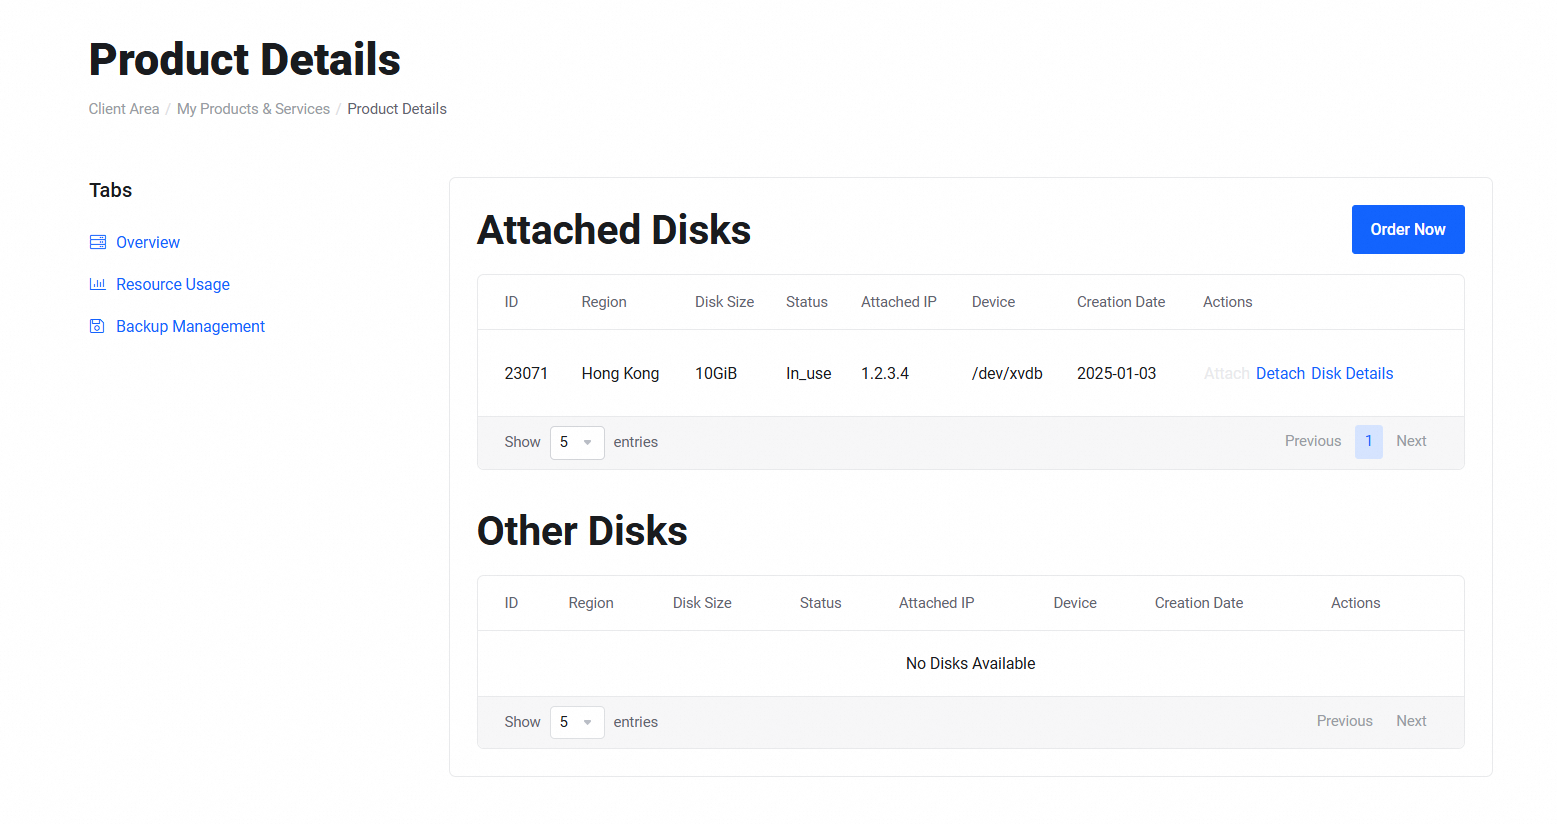
- go to the Cloud VPS console page where the data disk needs to be mounted, you can see the data disk to be mounted, and click the Attach button to mount the data disk to the Cloud VPS.
Note: a data disk can only be mounted to one Cloud VPS at a time. If you need to mount a data disk to another Cloud VPS, follow the following steps
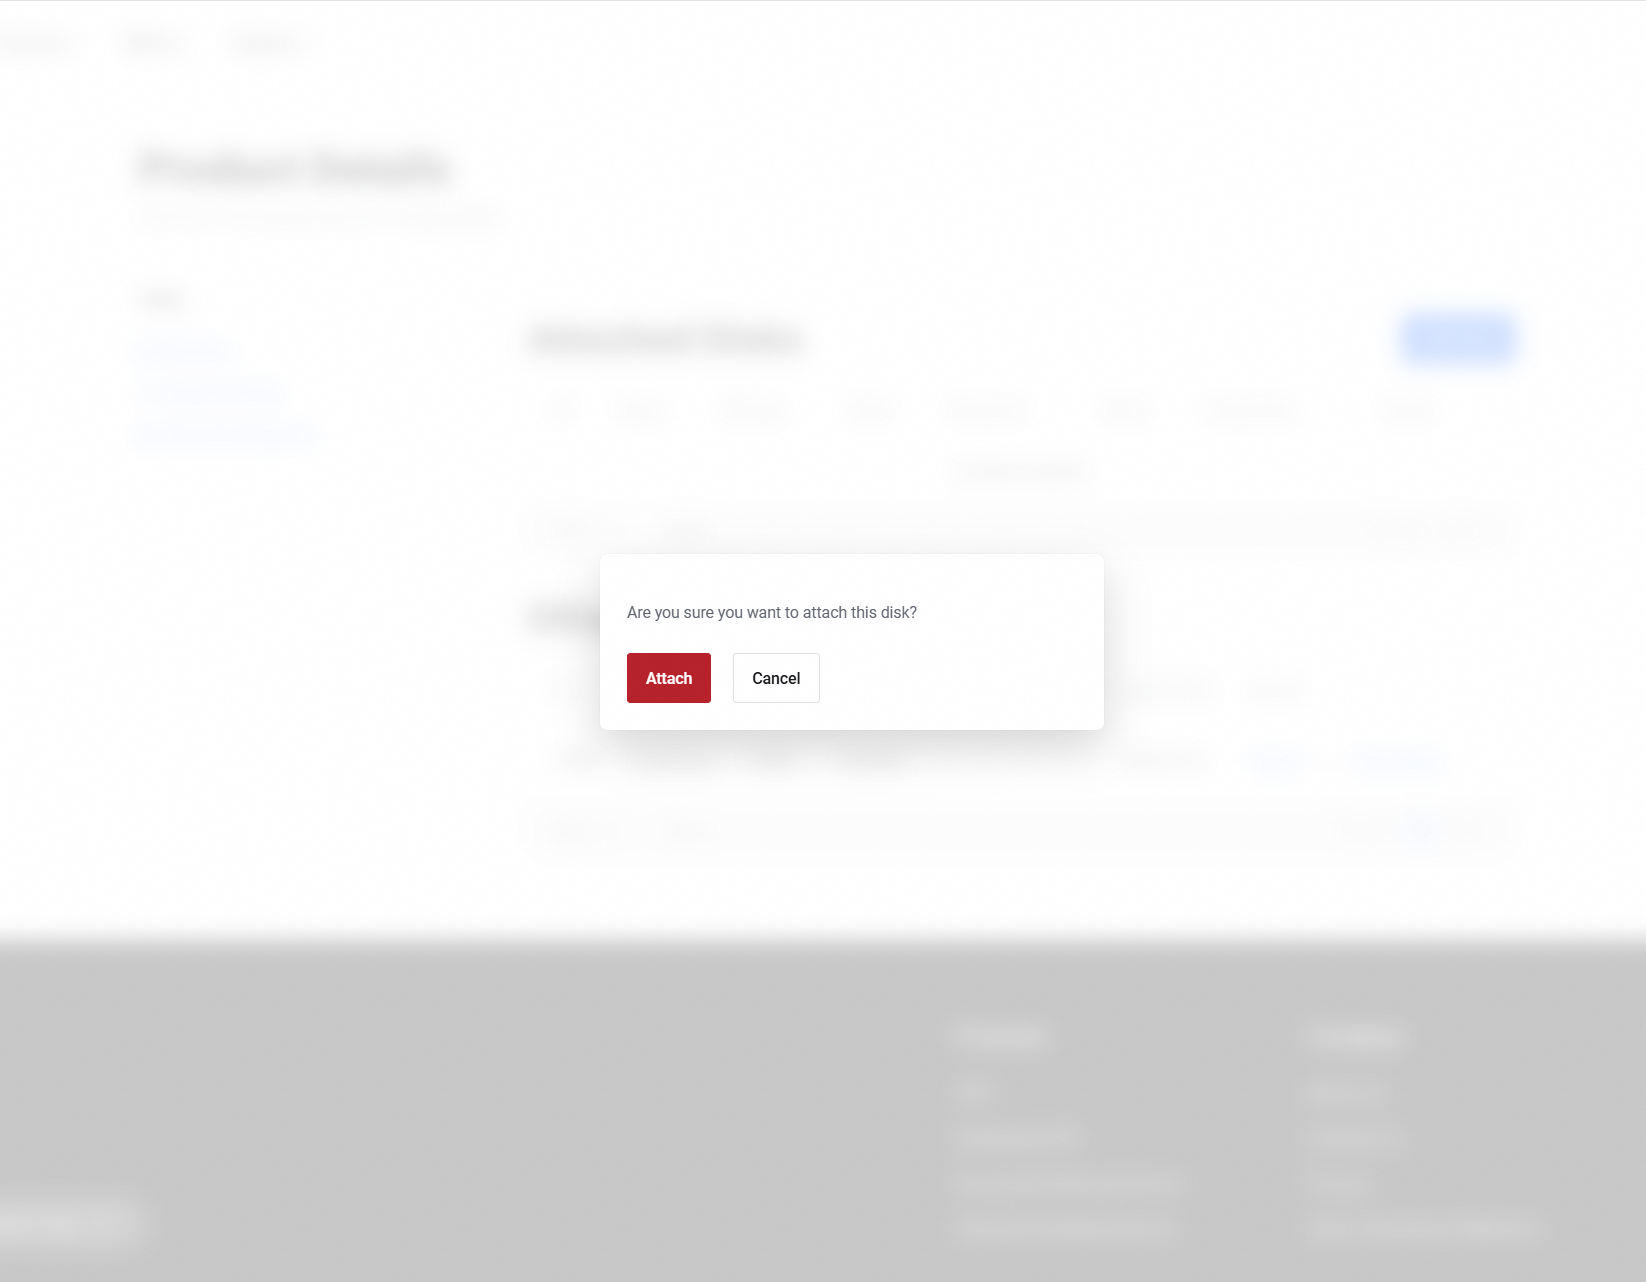
- click the latch button in the pop-up window to complete the mounting steps.
Note: after mounting, Cloud VPS cannot directly store data. It needs to be initialized before it can be recognized by the operating system and used to store data. For specific tutorials, please refer to the tutorial on initializing data disks.
Detach data disk

- return to the Cloud VPS console page that needs to unbind the data disk and click the Detach button.
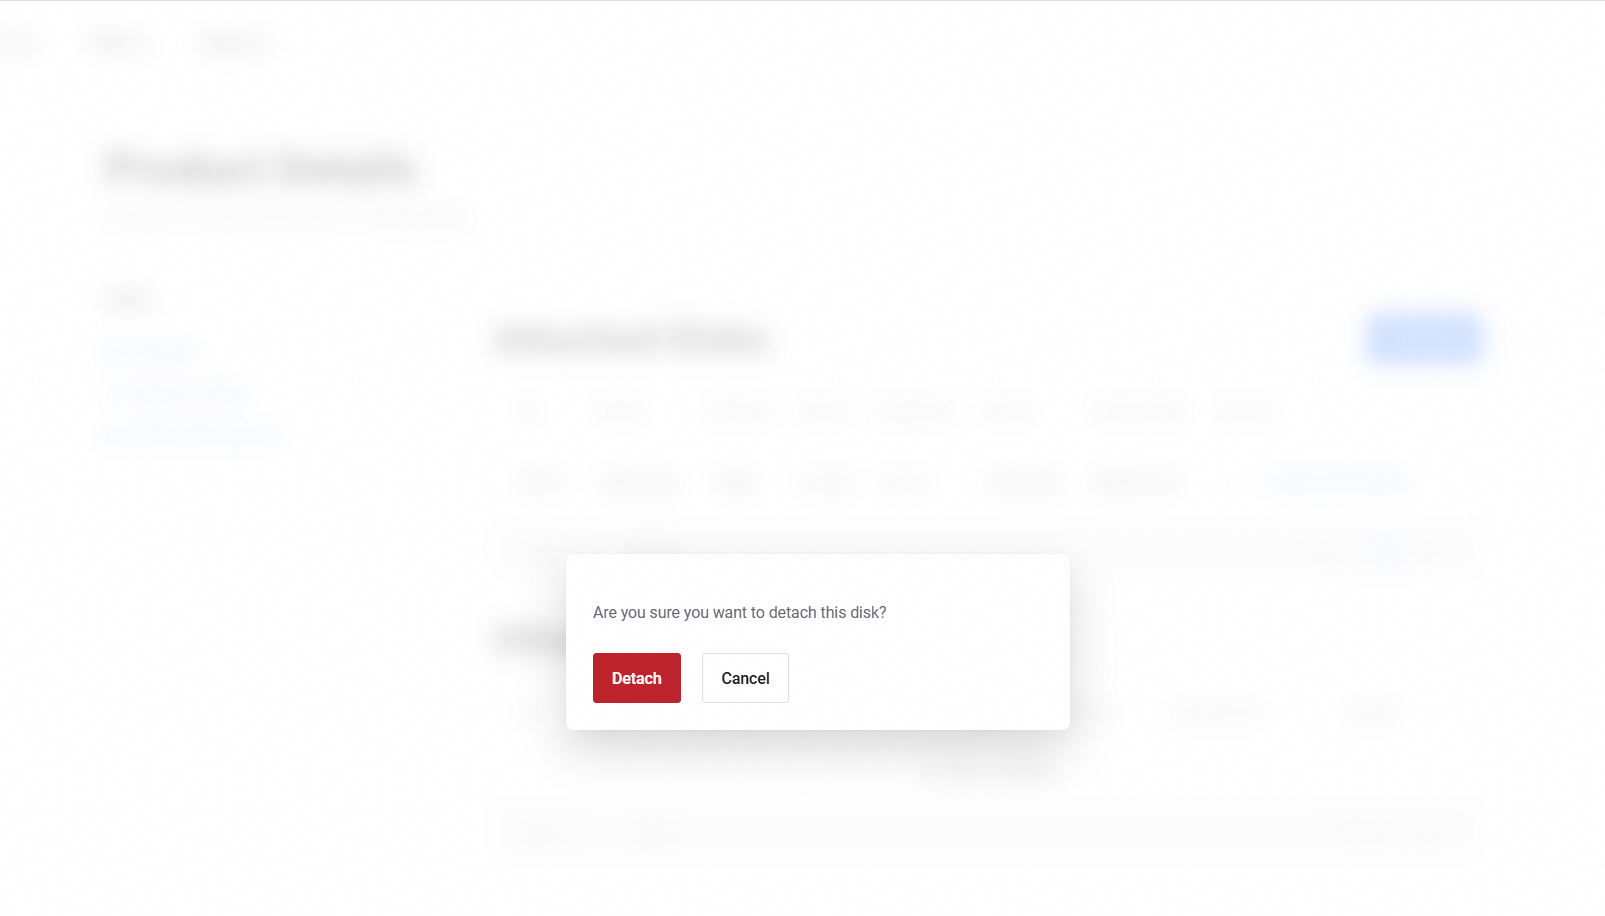
- click the Detach button in the pop-up window to complete the unbinding process of the data disk.
Initialize data disk
Linux
log in to the Cloud VPS server through SSH
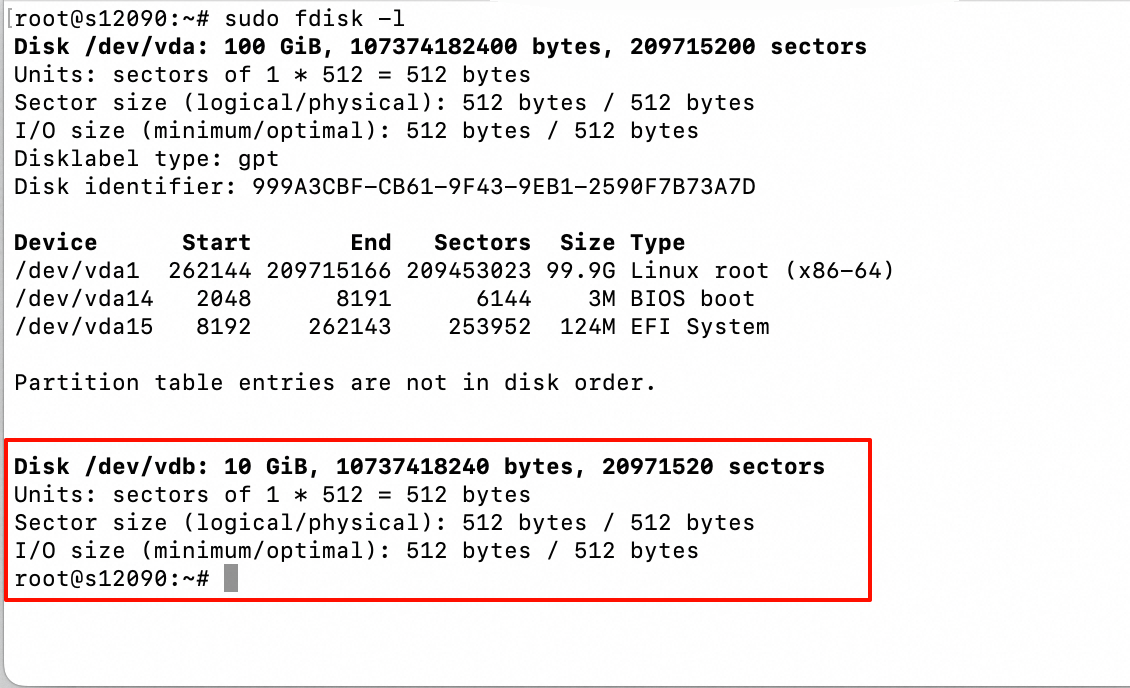
Run the following command to obtain the device name of the data disk:
sudo fdisk -l- ①:
/dev/vdais the system disk, which is created together with the instance and already initialized. - ②:
/dev/vdbis a data disk, which needs to be initialized.
- Create a GPT partition for the data disk and run the following command to install the Parted tool:
yum install -y parted  //For RHEL, CentOS, AlmaLinux
apt install -y parted //For Debian, Ubuntu- Use the Parted tool to partition the data disk:
- Run the following command to start partitioning. In this operation, the data disk
/dev/vdbFor example.
Sudo parted /dev/vdbNote:/dev/vdbIs the device name of the data disk, please replace it according to the actual environment.
a. Enter the following content in the Parted interactive command line to set the partition format to GPT partition.
mklabel gptb. Enter the following to divide the partition and set the start and end positions of the partition.
mkpart \<Partition name\> \<Start position\> \<End position\>Note: The start and end positions of the partitions are specified in units of MiB or GiB (4096B by default). If the units are incorrect, it will affect partition alignment and impact the performance of the disk.
Note: Please divide <partition name>, <initial position> and <end position> According to the actual situation.
- Single partition example: A primary partition named primary is created on the data disk. The start position of the partition is 1 MiB, and 100% of the disk capacity is allocated to the primary partition:
mkpart primary 1MiB 100%- multi-partition example: Two partitions are created on the data disk. The first partition is named primary with the capacity of 20 GiB. The rest of the disk capacity is allocated to the second partition named secondary:
Negotiart primary 1MiB 20GiB
Secondary negot 20GiB 100%
c. (Required) If you need to create multiple partitions for a single block storage, you need to repeat step c to create other partitions.
d. Run the following command to check whether the partitions are aligned.
Among them,1Is the corresponding partition number. It is generally recommended that you align partitions to obtain better block storage performance.
align-check optimal 1If the partitions are aligned, the result is as follows:
1 alignedNote: If The Returned is1 not alignedIndicating that the partitions are not aligned.
e. Enter the following to view the partition table.
printf. Enter the following to exit the Parted tool.
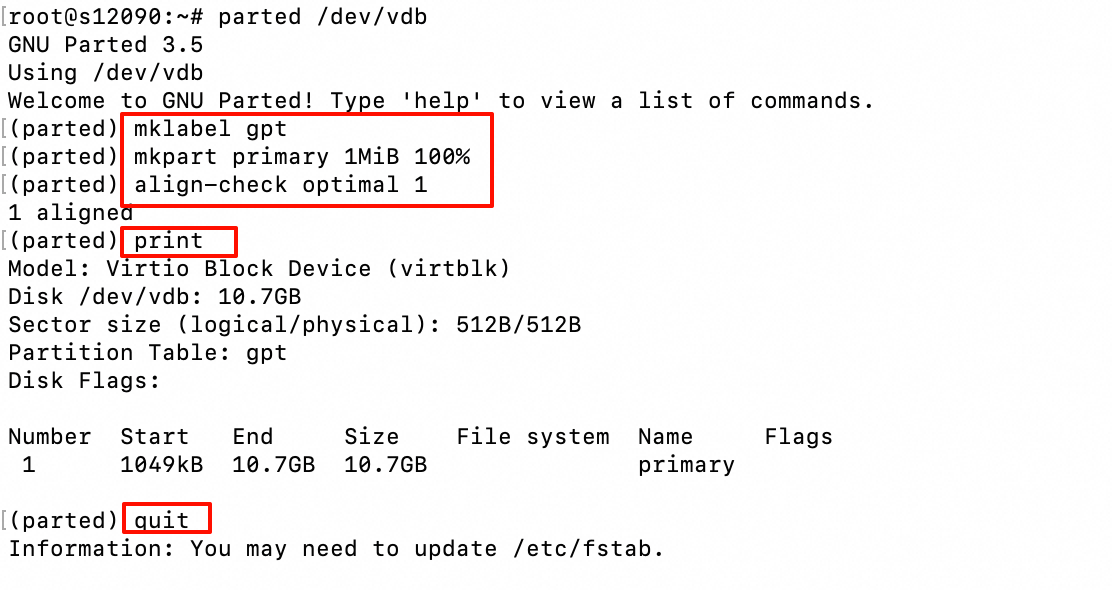
quitThe Parted tool partitioning process is shown in the following figure:
- Run the following command to make the system reread the partition table.
partprobe- Run the following command to view the new partition information. In this operation, the data disk
/dev/vdbFor example.
sudo fdisk -lu /dev/vdb/dev/vdb is the device name of the data disk. Replace /dev/vdb with the actual device name of your data disk.
The following command output is returned. If the new partition is created, information about GPT is displayed.
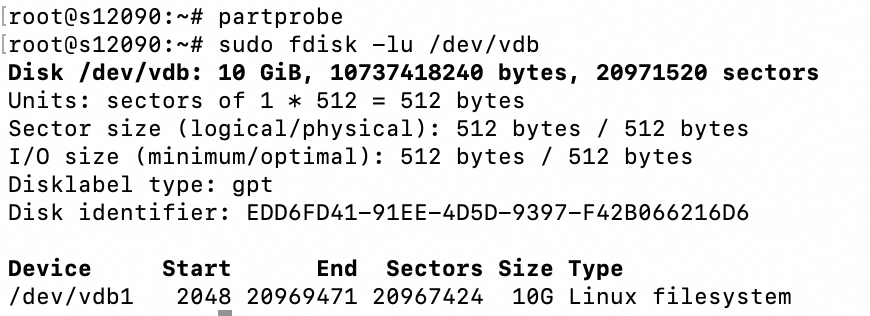
Create a file system for the partition and create a file system on the new partition. Different file systems support different partition sizes. Create a file system based on your needs.
Run the following command to create a file system. The following example commands show how to create ext4 and xfs file systems.
- Create an ext4 file system:
sudo mkfs -t ext4 /dev/vdb1Among them,/dev/vdb1Is the partition name of the data disk, please replace it according to the actual environment.
- Create an xfs file system:
sudo mkfs -t xfs /dev/vdb1- Among them,
/dev/vdb1Is the partition name of the data disk, please replace it according to the actual environment.
Example information is represented as data disk partitions/dev/vdb1Create an ext4 file system.

- configure the boot automatic Mount partition, write new partition information in
/etc/fstabas needed, configure the boot automatic mount, to ensure that the system will automatically mount the cloud disk partition every time it starts.
a. Run the following command to back up the/etc/fstab file.
source cp /etc/fstab /etc/fstab.bakb. Write the new partition information to/etc/fstab.
sudo sh -c "echo `blkid /dev/vdb1 | awk '{print \$2}' | sed 's/\"//g'` /mnt ext4 defaults 0 0 >> /etc/fstab"Among them:
/dev/vdb1: The partition name of the data disk, you need to replace it according to the actual environment (throughdf -ThCommand to get)./mnt: The mount point of the partition, you need to replace it according to the set mount point (df -ThCommand to get).ext4: The file system type of the partition, you need to replace it according to the file system type that has been created (df -ThCommand to get).defaultsThe Mount parameters of the file system.
c. (Required) If a single disk has multiple consecutive partitions, write the partition information to/etc/fstab.
For example, a data disk/dev/vdbThere are 2 partitions/dev/vdb1And/dev/vdb2, you need to execute the following commands separately:
sudo sh -c "echo `blkid /dev/vdb1 | awk '{print \$2}' | sed 's/\"//g'` \<Mount point of the /dev/vdb1 partition\> \<File system type of the /dev/vdb1 partition\> defaults 0 0 >> /etc/fstab"
sudo sh -c "echo `blkid /dev/vdb2 | awk '{print \$2}' | sed 's/\"//g'` \<Mount point of the /dev/vdb2 partition\> \<File system type of the /dev/vdb2 partition\> defaults 0 0 >> /etc/fstab"
d. Run the following command to view the new partition information for/etc/fstab.
cat /etc/fstabThe result is as follows. The new partition information appears in the returned result, indicating that the write is successful:

Note: If the partition information queried is incorrect, you can manually edit the /etc/fstab file, delete the incorrect partition information, and then add the partition information again.
e. Run the following command to mount the file system configured in /etc/fstab . If no error is reported, your /etc/fstab configuration is correct.
sudo mount -a- Run the following three commands to verify whether the automatic Mount function takes effect.
sudo umount /dev/vdb1
sudo mount -a
mount | grep /mnt
As shown in the following figure, run the commanddf -hIf a new file system is displayed, the file system is successfully mounted:

At this step, a 10 GiB data disk has been successfully initialized and mounted on/mnt Directory.
Windows Server
connect to Cloud VPS through remote desktop or other means
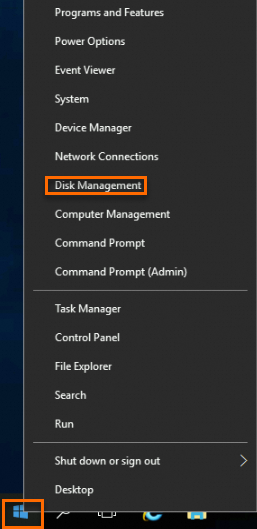
On the Windows Server desktop, right-click
 Icon, and then click Disk Management.
- find the data disk to be initialized (this example takes disk 2 as an example), which is offline.
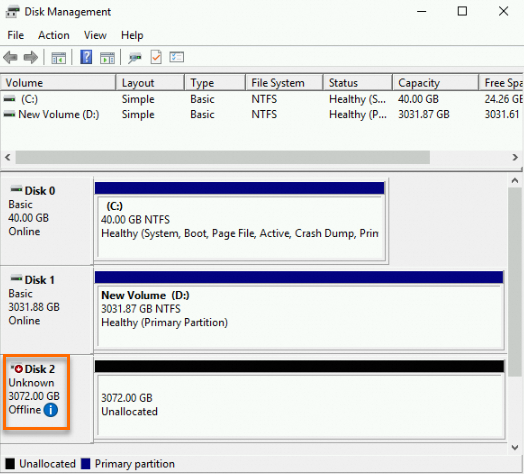
- right-click the blank area of disk 2, select online.
When online is complete, the status of Disk 2 is shown as Not Initialized.
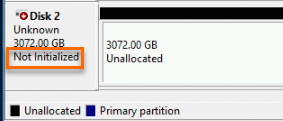
- Right-click the blank area of Disk 2 and select Initialize Disk from the pop-up menu.
- In the Initialize Disk dialog box, select Disk 2, select the disk partition format as GPT, and then click OK.
- Right-click the unallocated area of disk 2 and select new simple volume to create a 3 TiB NTFS format volume.
- In the New Simple Volume Wizard dialog box, click Next, and then complete the initialization operation according to the Wizard.
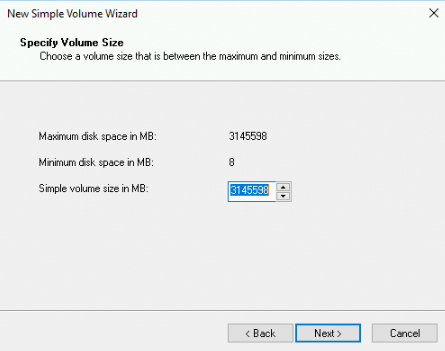
- In the Specify Volume Size dialog box, set the simple volume size, and then click Next.
If you only need to create a main area, just use the default value. You can also set the simple volume size according to your needs and divide the disk 2 into multiple partitions for use.
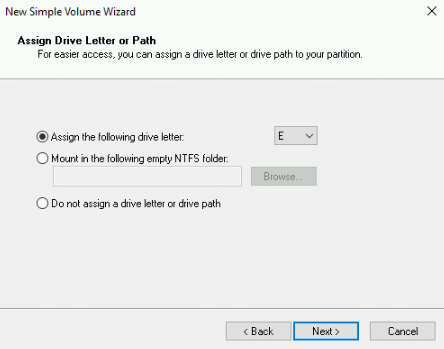
- In the Assign Drive Letter and Path dialog box, select Assign the following drive letter, and select the drive letter name (This example uses E as an example), and then click Next.
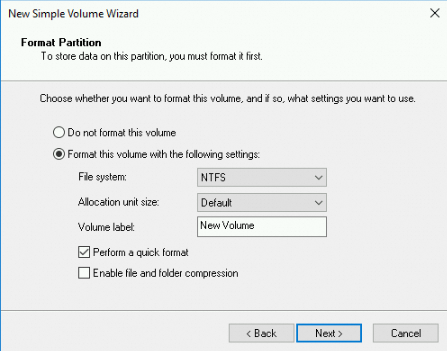
- In the Format Partition dialog box, select Format this volume according to the following settings, set the formatting information, and then click Next.
- View the new simple volume information and click Finish to close the New Simple Volume wizard.
After the initialization is completed, the status of Disk 2 in Disk Management is shown in the following figure.

You can view the new volume (E 😃 of the new drive in this computer. At this point, you can start using this data disk.


